
Setting up VPN
Gluetun VPN Addon Setup Guide
Basic setup of the TrueCharts Gluetun VPN addon.
Prerequisites
VPN provider
Ideally, a VPN provider supported by Gluetun, check the Gluetun Wiki for more info. There are custom providers but that is beyond the scope of this guide.
Security restrictions
Using TalosOS and the new ClusterTool, security restrictions are more strict. So it would be possible you encounter some errors during deploying the vpn-addon, like:
Error creating: pods "xxxxx" is forbidden: violates PodSecurity "baseline:latest": non-default capabilities (container "xxxxx" must not include "NET_ADMIN", "NET_RAW" in securityContext.capabilities.add)
In that case you need to review your namespace. Adding privileged to your name space can be done as follow:
kubectl label --overwrite ns <NAMESPACE> pod-security.kubernetes.io/enforce=privileged
More information can be find on the kubernetes website.
Gluetun VPN Addon Setup
Install the chart as per usual and add the the section for Gluetun like shown below. Don’t forget to set your Network in the excludedNetworks_IPv4 and enable the killswitch if desired, as shown below
addons: vpn: type: gluetun killSwitch: true excludedNetworks_IPv4: - "192.168.178.0/24" excludedNetworks_IPv6: []Gluetun works with Environment Variables so we need to configure them below. Enter your VPN Provider specific ones as below.
OpenVPN Example
addons: vpn: type: gluetun killSwitch: true excludedNetworks_IPv4: - "192.168.178.0/24" excludedNetworks_IPv6: [] env: VPN_SERVICE_PROVIDER: "windscribe" VPN_TYPE: "openvpn" OPENVPN_USER: "username" OPENVPN_PASSWORD: "password" SERVER_REGIONS: "Canada East" SERVER_CITIES: "Montreal"All providers will generally need VPN_SERVICE_PROVIDER and VPN_TYPE. For me, it’s Windscribe and openvpn but I could easily choose Wireguard.
Check the Gluetun Wiki to find your specific provider and enter their info, e.g. Windscribe Wiki Page.
Wireguard Example
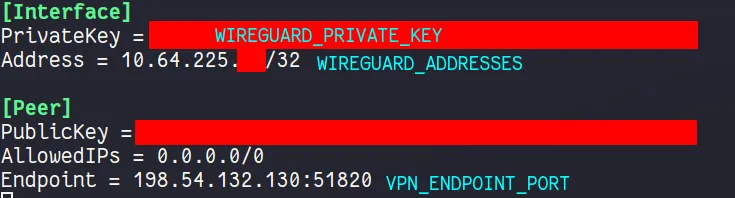
I will demonstrate Wireguard VPN setup using Mullvad as the provider. I pull my private key, endpoint port and Wireguard Addresses from a Mullvad wireguard config file.
You can generate a new config file from the Mullvad website, here is the Mullvad Config Generator.
Now we can enter the Env Vars. Install the chart as per usual and add the specific env vars to the gluetun section:
addons: vpn: type: gluetun killSwitch: true excludedNetworks_IPv4: - "192.168.178.0/24" excludedNetworks_IPv6: [] env: VPN_TYPE: "wireguard" VPN_SERVICE_PROVIDER: "mullvad" WIREGUARD_PRIVATE_KEY: "xxxxxxx" FIREWALL_VPN_INPUT_PORTS: "59241" WIREGUARD_ADDRESSES: "xxx.xxx.xxx.xxx/32" SERVER_CITIES: "Torronto" VPN_ENDPOINT_PORT: "51820" WIREGUARD_PUBLIC_KEY: "xxxxxxxx" VPN_ENDPOINT_IP: "xx.xx.xxx.xxx"- VPN Config File Location is not necessary, we will be using environment variables instead, so leave it blank
VPN_TYPEiswireguardVPN_SERVICE_PROVIDERismullvadin my caseWIREGUARD_PRIVATE_KEYis the private key from theMullvadconfig file aboveWIREGUARD_PUBLIC_KEYis the public key from theMullvadconfig file aboveFIREWALL_VPN_INPUT_PORTSis the port forward portWIREGUARD_ADDRESSESis theMullvadendpoint IP address, found in theMullvadconfig file aboveSERVER_CITIESis theMullvadserver city, it should likely be in from the same city your config file is from, and should share the same city as your forwarded port In my case, I am using theTorontoserver city, and my forwarded port is fromTorontoVPN_ENDPOINT_PORTandVPN_ENDPOINT_IPis theMullvadendpoint port and ip, found in theMullvadconfig file above.
Verify it works
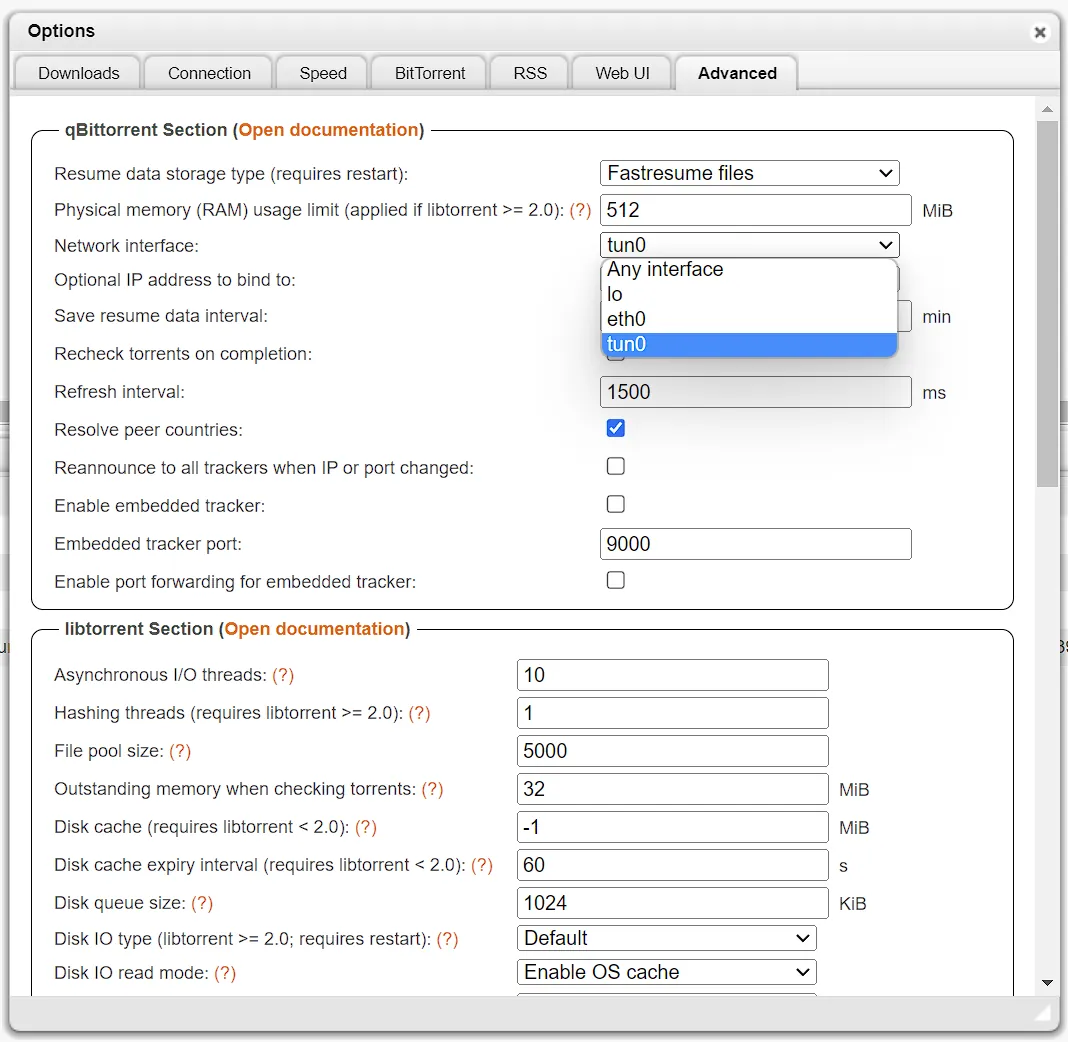
The easiest way to verify after it deploys (the chart will fail if your credentials don’t work) for me is using qbittorrent since the network page showing the interfaces
can be shown quickly (or check the logs), the interface will be tun0.
Additional Gluetun Options
Proxy Example
Gluetun offers HTTP (and Shadowsocks) proxy support. This is useful in scenarios when a private tracker requires the same IP address for both indexing and downloading torrents. It is also generally useful if you want to route some HTTP traffic through your VPN from another container.
Step 1: Set the HTTP Proxy VPN Environment Variables
Those env have to be set additionally to your VPN setup from above.
HTTPPROXY:onHTTPPROXY_LOG:on(optional, but useful to verify initial setup)HTTPPROXY_LISTENING_ADDRESS::8888(optional)FIREWALL_INPUT_PORTS:10095,8888
addons: vpn: type: gluetun killSwitch: true excludedNetworks_IPv4: - "192.168.178.0/24" excludedNetworks_IPv6: [] env: HTTPPROXY: "on" FIREWALL_INPUT_PORTS: 10095,8888 #optional HTTPPROXY_LOG: "on" HTTPPROXY_LISTENING_ADDRESS: :8888Only the additional ENV needed for the Proxy are shown here to keep it shorter. You still need your VPN setup from above.
Gluetun’s default HTTP proxy port is 8888. If you wish to change the port, then change it by adding the HTTPPROXY_LISTENING_ADDRESS environment variable.
See Gluetun’s website for more proxy configuration options (like setting a username/password):
Step 2: Add a new service for the proxy
On the same chart where you configured the Gluetun VPN addon proxy environment variables, add the following additional service to your values.yaml as shown below. If you want to use said Proxy outside your Cluster you need to setup a LoadBalancer.
service: proxy: enabled: true ports: gluetun: enabled: true port: 8888 protocol: "http" targetPort: 8888 type: "ClusterIP"Step 3: Determine the proxy internal DNS name
The service name will end in -proxy. For a chart named qbittorrent it will be:
qbittorrent-proxy.ix-qbittorrent.svc.cluster.local
If your chart is named something different, you can look it up using k3s kubectl get svc -A.
Step 4: Configure the proxy in your indexer chart (Prowlarr)
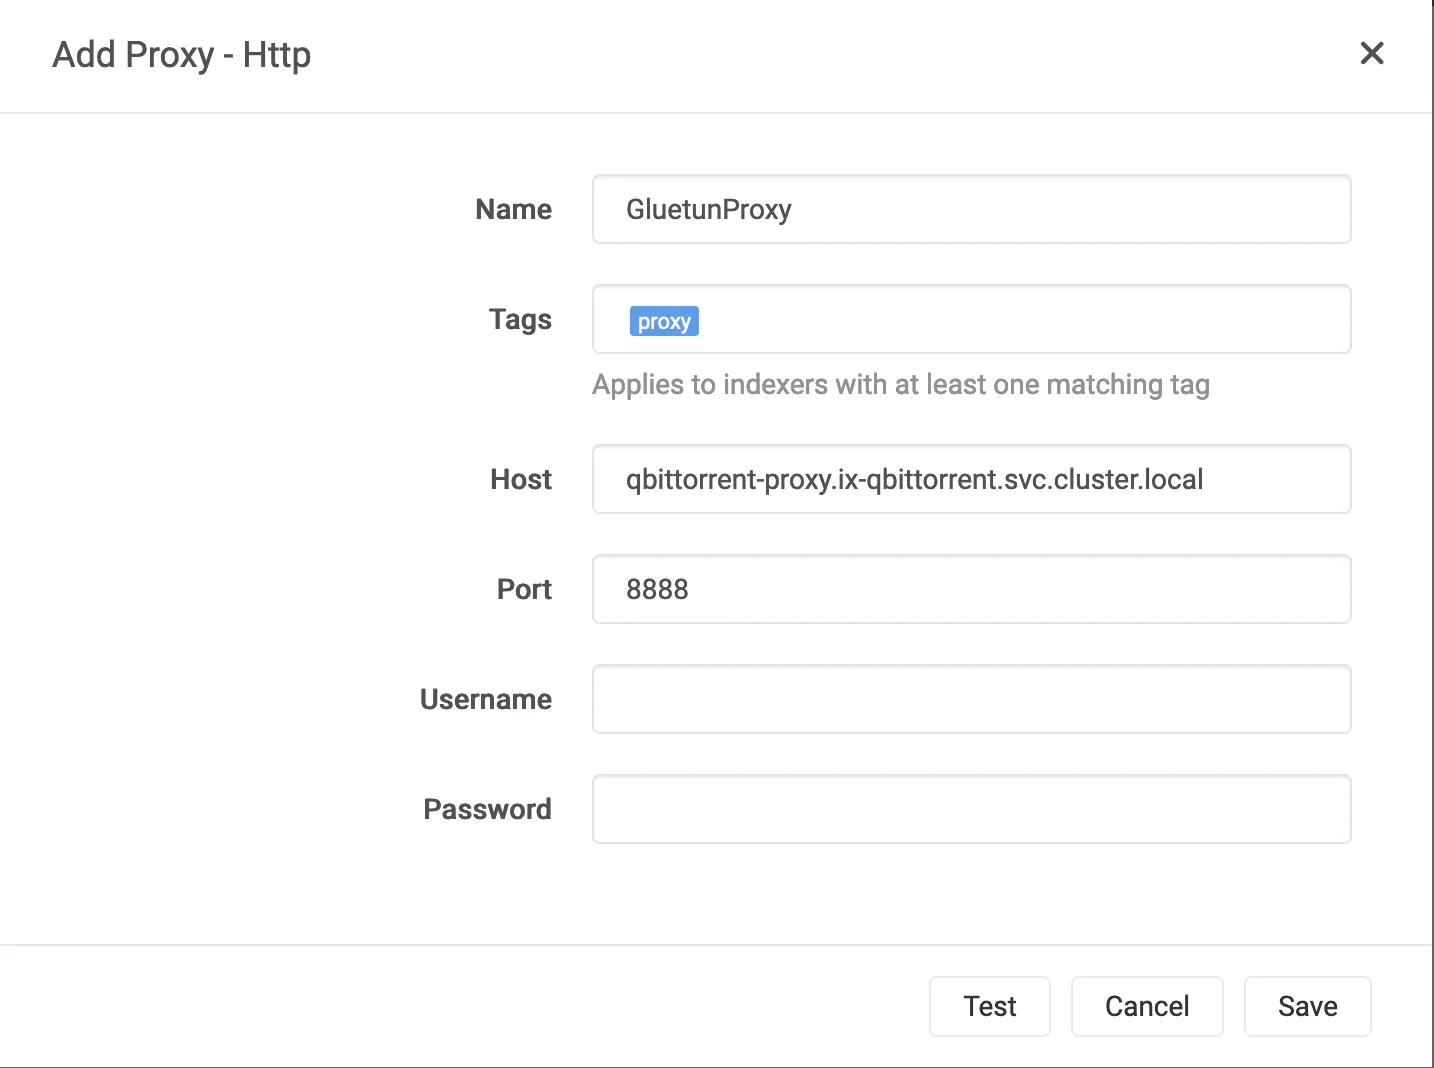
In Prowlarr, under Settings -> Indexers -> Add [Indexer Proxies], select Http
- Name:
GluetunProxy(or whatever name you prefer) - Tags:
proxy(set this if you only want the proxy to be used on certain trackers/indexers, otherwise leave blank) - Host:
qbittorrent-proxy.ix-qbittorrent.svc.cluster.local - Port:
8888(or whatever port you configured) - Username & Password: leave blank (unless you added those env variables).
- Click Test to confirm connection, then Save.
If you added a proxy tag, make sure to also add that to the desired Indexers, under Indexers -> Edit Indexer -> Tags.
Your indexer traffic will now be routed through the Gluetun HTTP proxy. Check the qbittorrent-vpn container logs to confirm.
Talos specific config
In talos in order to use the tun interface for Gluetun a workaround is needed otherwise you will get an error with permissions creating the tun interface.
Step 1: Add the generic-device-plugin
Install the generic-device-plugin from our helm chart repository. Make sure to make the namespace privileged.
Step 2: Add this into your helm-release.yaml for your app
Here is an example snippet on how to add it:
apiVersion: helm.toolkit.fluxcd.io/v2kind: HelmReleasemetadata: name: chart namespace: namespacespec: postRenderers: - kustomize: patches: - target: version: v1 kind: Deployment name: qbittorrent patch: | - op: add path: /spec/template/spec/containers/1/resources/limits/truecharts.org~1tun value: 1 interval: 5m chart: